![]()
![]()
![]()
![]()
![]()
![]()
![]()
![]()
![]()


All my content and ptohos

Main page... Popular tags: Electronics (12), Linux (11), DIY (8), Hack (8), Retrocomputing (7), Other (6), Debian (5), Curiosities (4)
Debian Linux on a GPD Win
2018-01-05 22:09:17, In: Linux, Debian
OK, so I bought a GPD Win. Small, Intel-powered computer with 4GB of RAM, Atom processor (2-core, 4-thread?) and 64GB of SSD. Unfortunately, with Windows 10 by default.
Because I found Windows 10 unbearable even when following the manuals to optimize and make it smaller, I decided to try with Debian.
Unfortunately this device is a completely closed UEFI machine so it doesn't allow much modification. However, I found Debian USB sticks, when not touched, bootable.
This is a set of notes which are based on Hans De Goede's blog entry about installing Fedora on GPD Win.
What will be needed
Installation of Linux on GPD Win is quite specific and different than typical Debian installation. Many drivers for things like Wi-fi or sound chip are absent, improperly installed or misconfigured so it's needed to patch the system up. To do it, you need
- A GPD Win
- A 4GB USB stick or bigger
- USB hub. The faster the better.
- USB wi-fi adapter which works in Linux out-of-the-box. Avoid Ralinks (it may only detect networks).
- An external USB disk with at least 20GB of free space for backups.
- Another PC with Debian to build kernel on.
And of course Debian-firmware live/installation media which can be obtained from Debian's repo.
To the backups!
The most important thing when putting Linux to such device is having a backup drive image. Unfortunately this machine is quite limited, so we will use a Debian-firmware live image with LXDE. Download it and dd to USB stick.
What I found from messing with it, if you add something to it, it won't show in UEFI BIOS as bootable. If you extract data and mkisofs it back with your add-ons, it won't show in UEFI BIOS as bootable too. So we have to use "bare" installation drive. More, even if we put the right file in firmware directory, we won't get a good result because Debian 9 has a bit outdated firmware for the built-in wifi. Net-installation can theoretically be made using external working wi-fi dongle but their support in Linux is generally poor. What is more preferred, Debian can be installed from the installation media like live CD with e.g. MATE. Choose only Debian with non-free firmware to have Broadcom binaries present.
So plug the USB hub to the GPD Win, plug the USB stick to it, turn the Win on pressing Esc or Del on a boot screen. Enter the BIOS, go to the rightmost tab and go down to the USB boot (if USB disk is not visible, it's made wrong way). Press Enter and boot until you'll see the GRUB.
Now an important thing: The GPD Win uses a smartphone screen, so it is rotated by software. By default, picture is rotated by 90 degrees.
Before running the Live CD, edit the item in GRUB (press e) and move with cursor to vmlinuz line, adding i915.fastboot=1 fbcon=rotate:1 to the end, but before this "{...}" (i don't know what it does). This will make the console rotated properly at least for booting. Confirm edit with F10.
When the desktop environment starts, it'll be rotated again. Open the Terminal (MATE terminal or LXTerminal in LXDE) and type:
xrandr -o right
to fix the screen again.
Now connect the USB backup drive to the hub. You should have 2 devices connected. In Debian ISO with MATE Desktop, it will automount and pop in /media/... cd to the backup drive with your terminal and check with ls that its contents are there. cd .. to go to /media
You see the additional directories? They are GPD Win's partitions, we don't need it and it may interfere with backup. umount them one by one. Go to your backup drive again and let's image a whole drive to a compressed image:
dd if=/dev/mmcblk0 bs=64K | gzip -c > ./gpdwin.img.gz
This will make a compressed backup copy of an entire 64GB internal drive. This may take a few hours (if a slow USB hub is used) so observe CPU usage, put the fan of GPD win to medium position and wait until the dd finishes its operation. Do it on power supply, not a battery. The compressed 64GB image of the unaltered, factory-new Win has around 12-15GB in size.
We have to use live-cd because installation version has significant problems with mounting anything.
Cutting the partition
Shutdown the live Linux properly, remove USB disks and re-boot to Win10. Open Hard disks management and:
- Do not move the first, small partition. This is for UEFI and boot managers, both for Windows and Linux. Having boot dependent on such thing is asking for trouble, but UEFI standardizes this.
- Do not move this small partition which exists right after 100MB one (if you have it), no idea what is it for, but Win10 doesn't like removing it.
- Avoid moving the last recovery partition (800MB).
Take the biggest partition with Windows and just reduce its size leaving a hole before the last recovery partition. This will be used to install Linux. In my case the hole has around 32GB in size. Shut the Win10 down... PROPERLY!
Do not shut it down using its shutdown-hibernation feature, better turn it entirely off (in my Win it was disabled anyway with hibernation), because if you add files to Windows partition in Linux when Windows 10 is hibernated, it may drop these files from disk. This "turning off" is more like hibernation, officially made to start the system up faster but probably to preserve resident malware in memory, especially for agencies which can't afford Intel ME or CPU backdoors.
Installation
So we install Debian. Connect the hub and installationmedia into it. Do not connect the wi-fi adapter yet. Turn on, hold Esc or Del, last tab, select USB drive. Wait for GRUB. This time, select "Install", and again press e to edit item.
NOW CONNECT WI-FI DONGLE. With many dongles, especially Ralink, it may hang in the BIOS starting because they identify themselves in a non-standard way.
Edit "vmlinuz..." line adding i915.fastboot=1 fbcon=rotate:1 confirming with F10.
These commands with fbcon will rotate the kernel screen, but not the installer, so you'll end with performing installation with your head turned counterclockwise :).
A few information about UEFI compatibility of Debian: Debian will take care of UEFI partition and install the bootloader there. No need to force GRUB into anywhere.
Perform installation as usual, using USB stick as connection with the Internet if needed. Usually it is only important to point the wi-fi dongle in Debian installer and connect to some network, or it may not install network tools at all.
With Debian's manual partitioning you can add some small Swap and some larger partition for root directory. IMHO there should be swap for emergency cases, but turn the swappiness to 1 after installation (edit /etc/sysctl.conf adding vm.swappiness=1 line to it) to make system not damage your SSD.
Additionally while partitioning, do not mess with boot flag setting, but add noatime and nodiratime advanced flags to your root partition to make system write faster to SSD.
When re-booting after installation, check does the Linux run and does the Windows run too from GRUB. The GRUB should have a Windows in its list, but menu will still be rotated. There is probably no way to make it run in non-rotated way.
Build the kernel
On the other PC with Debian, collect all things needed to build kernel. Among all things, you definitely need build-essential, libelf-dev, fakeroot, these SSL things with -dev (make will point you if you don't have it, probably it's libssl-dev), then clone Hans' repository:
https://github.com/jwrdegoede/linux-sunxi
Or download it in ZIP and extract in TWO subfolders deep. For example, if you have a ZIP file in /home/user/Downloaded, extract its contents to e.g. /home/user/Downloaded/GPDWin/kernel. Cd there. Do not touch the configuration. Now just
make deb-pkg -j 9
in 8-core CPU it's 9, it's number of threads. Reduce for slower CPU or I/O. If you have a faster HDD, the safe limit is number of cores + 1, if not, use number of cores not to make CPU wait for disk. For dual-core Core2 duo it's -j 3.
If everything goes OK and dependencies are right, it'll finally generate 3 Debian packages in the /home/user/Downloaded/GPDWin location (one level above sources). These are kernel packages ready for installation in Win.
Now we'll prepare a USB thumb drive to install on GPD Win.
Get these 3 debs to thumb drive (should be Linux-image, Linux-headers and Linux-libc-dev, the last one is for development using this kernel).
Also, get the Broadcom firmware configuration file from here.
and this sensor one, although it probably won't work: sensor.rules.
As well as these two from here.
Then make the file (e.g. rotategpd.sh) with the following contents:
#!/bin/bash
xrandr -o right
xinput -set-prop 'Goodix Capacitive TouchScreen' 'Coordinate Transformation Matrix' 0 1 0 -1 0 1 0 0 1
This is a complete set of commands to rotate both the screen and the touch panel properly.
More installing
Move to the GPD Win. Boot, pass i915.fastboot=1 and fbcon=rotate:1 to GRUB command. Put the USB thumb drive in the Win and then:
- Copy the brcmfmac4356-pcie.txt file to /lib/firmware/brcm
- Install 3 kernel packages.
- Copy the rotategpd.sh file to e.g. /etc and make it executable for everyone. Yes, I know, but I don't suspect such breaches.
- If you have Debian MATE like me, you'll have a LightDM login manager. There, modify the /etc/lightdm/lightdm.conf, uncommenting and modifying line:
display-setup-script=/etc/rotategpd.sh
- Modify /etc/default/grub to:
GRUB_CMDLINE_LINUX_DEFAULT="quiet fbcon=rotate:1 dmi_product_name=GPD-WINI55"
- Run update-grub to update GRUB settings.
- Now reboot. You should not need to pass anything in GRUB anymore, however GRUB will still be rotated. It should pop a new kernel and boot it by default.
Now you should have a working Wi-fi. So add a repo to system by editing /etc/apt/sources.list, adding:
deb http://ftp.debian.org/debian/ stretch main contrib non-free
or without this "contrib non-free" if there repos are not needed. Then apt-get update.
First of all, install (using apt-get) the xinput package. Run xinput and find the ID of "Goodix Capacitive TouchScreen" which is under "Virtual Core Pointer". There may be one under keyboards, not this one. Then edit, as root, the /etc/rotategpd.sh and change the 'Goodix Capacitive TouchScreen' to the id of this device you found. Like:
xinput -set-prop 13 'Coordinate Transformation Matrix' 0 1 0 -1 0 1 0 0 1
The thing here is that the touchscreen is now also shown, under the same name, as a keyboard. I don't know why.
Now, You can freely proceed as in Hans De Goede's blog post and it'll work.
Use files from your thumb drive - especially sound definitions are more up to date. You may need pavucontrol to control the sound outputs, although they are a bit lazy when monitoring headphone insertion. If it doesn't work make sure that you uncommented the line in pulse/daemon.conf (realtime-scheduling=no), removing # nor ; on the start. Alternatively try to start PulseAudio with --realtime=0 parameter.
What doesn't work? I found that only resuming from disk doesn't work at all. It probably should have some sensors too.
The keypad
In GPD Win, there are a few keyboards in the system. There is a +-pad assigned to W/S/A/D keys, and the /X/Y/A/B keys assigned to arrow keys, a keyboard for volume keys and something flooding the system all time. The alignment of D-pad is totally OK in gaming, but in productivity applications is not much useful. I decided to do the following modifications:
- +-pad to arrow keys
- A/B/X/Y as PgUp/PgDn/Home/End keys.
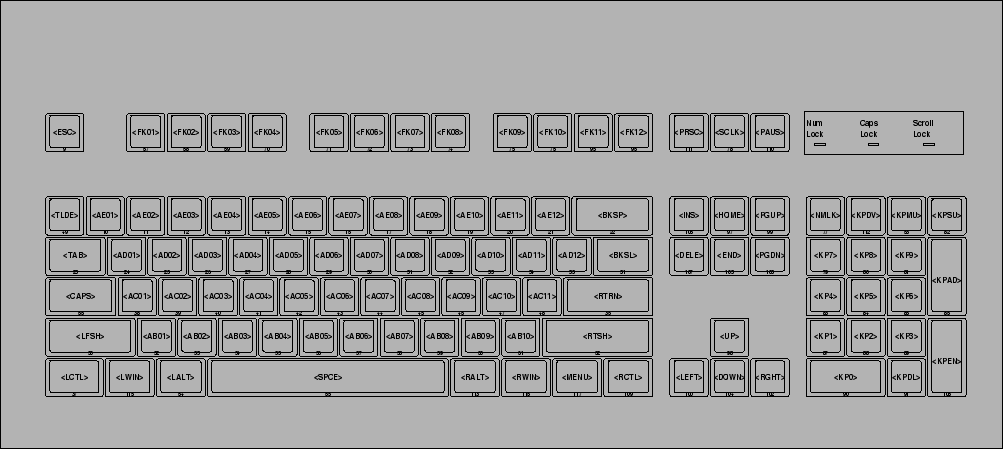
To do it, I edited the /usr/share/X11/xkb/symbols/eu file which defines the keyboard with Euro sign, you can use any unused keyboard file. I modified it the following way:
key <LEFT> { [    Home, .....
key <RGHT> { [     End, ....
key <UP>     { [     Page_Up, ....
key <DOWN> { [   Page_Down, ....
key <AD02> { [    Up, ....
key <AC02> { [    Down, ....
key <AC01> { [    Left, ....
key <AC03>  { [    Right ....
I used some existing definitions.
The key locations in <> can be seen in this picture.
The available codes are in /usr/include/X11/keysymdef.h (if you have it, if not it's in x11proto-core-dev package) with XK_prefix - just remove this prefix and this is a key.
Now I discovered the device which is responsible for arrow keys. Xinput's lists shown me "Mouce for Android" (yes, "Mouce"), device under "Virtual Core keyboard", that's it. Its ID is 11 in my case, so I have to enter command:
setxkbmap -device 11 -layout eu
to apply keyboard layout only to this device. However, the "arrow key" events may be simulatneously fired every now and then, so avoid connecting macros or programs to these keys, only re-define them as other keys existing on keyboard.
WARNING: After applying these keys, you may loose the "permanent key modifiers" option if you turned it on, this accessibility technique is a blessing in ultramobile PC. So turn them on again.
Generally Win is usable with Linux. It keeps temperatures and frequencies lower than Windows and still allows to read mail, run Thunderbird as organizer and surf the web with a browser. What's not so good, is the battery running time. I don't play games on it, it usually sticks under 1GHz and the time allows me to use it irregularly only for a 1-2 days if I suspend it or around 3 days if I turn it off (the startup with browser takes about half a minute in MATE).
The CPU is easily hackable with recent "meltdown" and "Spectre" attacks, so I browse without JS and pay attention to code - no HTML in e-mails, no executing any attachments, stripping text from documents. This is a very weak protection, but is some. I think in 2018 or 2019 we will finally have revealed this wavepacket backdoor (some people are indeed wirelessly hacked using it) and then all possible digital systems since Coppermine will be irreversibly screwed anyway.
Older post... Main page Newer post...